Welcome back people, in this video we’re going to be talking about Boolean operators. So, what is a Boolean? Well, basically is not just a Python specific concept it’s a programming concept in general and it consists of two items, one is true, one is false. Now in a lot of programming languages you typed true as “true” and false as, well you know how to spell those, but you’d spell them all lowercase, Python’s different. So let’s explore that a bit and open up terminal here, and launch a Python3 console, and we’re going to just type in true and it’s going to return true, this is not in quotations, make sure when you’re typing true and false for truth checking that you’re typing true and false and not like this, because that will return a string which is true, yeah. So let’s talk about what these operators do. Basically, and we’re going to get into comparison operators a bit later which is like checking if something is equal to something, or more or less than, or if it even exists, or if it’s a certain type, and so you can basically perform different actions on different types of data and that’s why it’s necessary to do some fact checking with that. So, we need the true and false in programming, however we can explicitly declare true-and-false like we’ve just done by just typing true or false, or we can generate it in other ways. So let’s have a look at some of the ways we can generate a true or false. So let’s type “5 = 5” that’s true. Now when you’re comparing two objects and you’re checking if they’re equal to each other you can’t type that because the single quote, the single equal sign there, is used for a different purpose and programming it’s used to assign a value to a variable, and we’ll go over that here soon as well. So when we’re comparing to check if two numbers or two strings are equal to each other we need to put two equal signs, so you’ll see that returns true. So let’s go ahead and “5 == 4” that’s going to return false because of course we’ve all been through grade 2 math and we all know that 5 is a little larger than 4. Now you can also do this with strings and also without using equal signs at all, you can actually type “5 is 5” and that will return true, and you can type “5 is not 5” and that will equal false. So basically you’re saying 5 is not 5 and Python is saying well that’s false. So you could type “5 is not 6” and that will return true. Again you can do this with strings as well so you can type “This” is “This” and this is going to compare both of these strings to see if they’re equal to each other and it’s going to return true because yes, it is. Now we can also do this “True is True” will return true because of course true is true. Now that last one is a bit of a you know obvious result, so let’s go ahead and compare this with this “True” is True. If you think this will return true because we’re comparing true and true the results will not be as obvious as you expect because one of them is a string and the other one is a Boolean operator. So, not only when you compare two items is it checking if the value is equal, it’s also checking the type of data that it is. So, if we wanted to make the above statement return true we would have to convert true into a string. So just like you would convert a number into a string, you can just wrap the Boolean operator in the str function and it will convert it to a string prior to the comparison, and then it will return the result of true is true which equals true. Now, true-and-false again they’re going to come up in in the if-else statements because that’s where we’re really going to do some error checking and you know make sure things are set and that you know they’re not just not equal to each other, and you’re going to see more practical uses of Boolean operators later on, but this was just to show you guys what true and false is and again you should already know this without a programming background. So in the next video we’re going to be looking at Pythons version of arrays which are called lists.
Alright, so what are some of the fun things and useful things that we can do with strings in Python? Well there’s a few concepts that I want to talk about here, so what we’re going to do is go ahead and open up a Python interpreter, you can do this in pycharm by going to view tool windows, and then selecting python console, or you can open up terminal and type Python3 and hit enter. However you enter this if you want to follow along that’s probably helpful because I find if you’re told how to do something you know you kind of know how to do it, but if you actually do it yourself you have a better handle on what happens, and you’re more likely to remember how it works. So from here on out basically what I want you guys to do is to follow along with your code and do everything that I do. So, with that being said one of the first things that we’re going to do is in a previous video when we were talking about numbers I showed you how to convert strings into numbers if the only thing in that string were numbers. So, this is going to be kind of the opposite. Let’s say you have a few values, let’s say you have the number 6, right, and you want to print out this costs six dollars. You can’t, just well actually first we’re going to talk about concatenating, because you can’t do that in Python. I’m going to show you how, but first let’s learn how to concatenate a string which means had a glue multiple strings together. So we saw this actually in the numbers video as well when we tried to add numbers that had been identified as the string or yeah the string type and what it did was concatenate the numbers and made 5 and 6, when you add them together, it made it equal 56, and so your gluing strings together. So I want to say “Hello, ” then pop out of that string put a “+” and then in this string I’m going to type “Nick” Now what’s going to happen is it’s going to print out “Hello Nick” because I’m concatenating these two strings. You can also do this with however many instances of strings you want, so if I really wanted to get a little bit convoluted I could do this and this would print out hello using five strings all concatenated together. Now what happens if I want to say this costs six bucks? “This costs” + 6 + “bucks” Well, because part of this line is an integer it’s going to try and use those plus symbols to perform a mathematical operation rather than printing out a string, actually it’s the opposite it can’t convert the integer to a string so it knows that we want to concatenate some strings together but it’s like well hey hold up this is not a string I don’t know what to do with this. So what we have to do is use the string function which is similar to the int function. So how we do that is “this costs + str(six) + “dollars” and what this is gonna do is it’s going to convert the number 6 to a string so it can be used. Now you can also perform mathematical operations within the string parameter, I believe so. Let’s test this out. “This costs” + let’s go str(6 + 5) + “dollars” and hit enter. Yeah, so it can perform mathematical operations within that parameter. It’s going to convert the sum or the result of whatever mathematical operation you are performing on it, it’s going to convert that to a string and then use that string to be concatenated with the other strings that you’re working with. So that’s how to use the string function and maybe this doesn’t seem like it’s going to be important, or maybe it does but you’re like well how often do you use this, you know. We’re going to see because when we get into defining some functions we’re going to be using both strings and integers to return certain information and so this is going to be important at that point. So, that’s how to convert integers to strings, it will also work for any other type. So if you have true, we’re going to get into that after actually, but we’re going to be using this string function again at a later point. Now what happens when you want to do the opposite of concatenating strings? So, think of concatenation, I’m not sure if that’s the appropriate term, think about contaminating two strings as actually let’s look that up. Now it’s gonna open up xcode just go in to Google here, because if I’m saying that wrong I want to know. Yeah, okay, concatenate, good stuff. Not sure if you guys heard that but I’m using that word correctly, good stuff. Alright, so anyway back to the code that’s how you concatenate two strings together. What happens when you want to do the opposite, you want to split strings apart? So, let’s say we have this string like this so we’re going to say “Hello:Nick” we’re going to separate that word from the other word with a colon so that we actually have a character that we can use to split. So what we’re going to do is after the string we’re going to put a “.split(“:”)” going to call a function split on it, and the split function or method takes one parameter, well for the sake of this video takes one parameter, and that’s where you want the string to be split. So we’re going to split it at the colon there and hit enter. What it’s going to do is it’s going to create an array with all elements that had been split from that point, so for instance it split it into two items in the array but let’s say I did this it’s going to have an array with three values in it, and then we can reference those values by its index number, so this is going to be a bit more complicated. Let’s say we’re splitting it at this so let’s concatenate that lets say “My name is” + so we want this to print out my name, and not hello world, and not anything else, so what we’re going to do is put 2 square brackets and the number one “[1]” and it’s going to say “My name is Nick” I’m not sure if that’s a bit too complicated, so I’m going to try and explain it again from the beginning. So, we have a string, we have it say my name is and then a space, and then we can concatenate it with the result of this right here. So this can be broken down into a few parts, here’s the string that we’re performing the split function on okay, then we’re calling split on it and this is going to turn this string into an array with three values each with an index. It’s gonna split it into hello, Nick, and world and stuff those values into its own array, and then we can access the result of this by using an index number here in square brackets so we’re calling the index number one, so hello would be 0, Nick would be 1, and world would be 2. So, what’s happening is it’s printing out my name is Nick. Now you might be thinking shouldn’t it be printing out my name is hello if we’re using the number one here? This isn’t so much Python but it’s a concept in programming in general, no. So, 0 equals 1. If you have an array the first item in it you think would equal 1 but it actually it equals 0 and we’ll talk more about arrays, which are actually called lists in Python, we will talk more about those coming up in you know I think not the next video but the video after the next one. So that’s how you can manipulate strings in a very basic way, we might expand on this in the future, we actually probably will. So, next we’re going to be talking about Booleans.
Welcome! Here you can learn you how to master Linux command line (BASH). What do I mean by this? Ever seen a system admin in a movie or some devious hacker using a terminal? Do you want the same knowledge? Well you are in the right place!
This course is designed to take you from beginner to advanced in the Linux command line using bash (Bourne-again shell), a Unix shell and command language. You get 10+ hours of HD videos full of useful tutorials founded on motivation and excitement for learning bash programming! You can count on an answer to every question you ask in the course from a Linux command line expert which gives you peace of mind that you can get help with every challenge you have as you learn!
Welcome all. This is an introduction to ethical hacking for 2016-2017. And before I continue any further, some of you may know me from the previous ethical hacking course, and this one will be significantly more advanced as opposed to that one. That being said, the requirements for this one will be also significantly different. But before we continue any further, let me just go over a few things. First of all, my throat is getting dry, because this is like the fifth time that I’m attempting this and certain people, certain very rude people keep interfering. But anyway, there a few considerations to make here. So the first one, is what can you expect to learn from this course? Well, you can expect to…I will show you basically, how you can compromise systems, monitor a traffic in the air, fight against encryption, what you can do with encrypted traffic, how you can attempt to decrypt it. Some of it you will be able to decrypt, I will show you various methods, Listening booths in the middle, and how to take off certain layers of encryption, and extract the useful information from the data which is out there in the air. I will show you various methods how to compromise systems in general, like PCs, servers, phones, smartphones that is. And we also may play around a little bit with the GSM network and see some of the vulnerabilities there. That’s a 2G network, so you have 2G, 3G and 4G. 2G is the GSM and 4G is the LTE. Anyway, we will be most likely, I will most likely at a certain point in time also talk a little bit about social engineering and you will see the practical aspect of that as well. But, there are two kind of considerations that you should make when taking this course. So, moral side of things and legal considerations. So, just because you will be able to do something, and I will teach you how to do some serious damage with the knowledge that you get you will be able to do some serious damage, but it doesn’t mean that you should. There really is no need for you to do so. And just think about it, you don’t want anybody messing with your stuff, so don’t mess with anybody else’s stuff. There really is no need, or justified reason for you to do it. Legal aspects, legal considerations. In most countries, it is illegal to mess around with systems you don’t have permission to mess around on systems that you yourself do not own. Just to give you a stupid example, it’s illegal to mess around with your neighbors Wi-Fi. It’s illegal to connect to it without that person’s permission, who owns it. So even these small, I would say, inevitable things are taken into consideration by law. Not to speak of breaking into the servers or taking information from the phones, personal information from the phones and other kinds. That’s all covered as well. So you can get into a lot of trouble if you misuse the knowledge. I will give you a lot of knowledge here, I will show you how to do various things. Please, do not abuse the knowledge. Use the knowledge, do not abuse it. Ok, that being said, let’s go over to the other side. Besides of the cute puppy up there that my friend drew, sitting over there smiling, for some strange reason. He doesn’t want to come on camera, God knows why. You will have software and hardware requirements for this course, so those are the two. You have three requirements, one is software, one is hardware and the third one is, your current knowledge, your current amount of knowledge, so to say. Let’s get into the operating systems. So, Windows and OSX are completely incompatible for our purpose. On OSX you lack a large amount of tools and you lack hardware compatibility in the first place, even though you have a Unix-like Shell, it’s really not a system that you want to use for this purpose. Windows as well, Windows is even worse. You don’t have the degree of anonymity while using Windows is not really that good. With Linux, is open source, you know all the traffic that’s coming out, that’s going in, to monitor, to know exactly what it is, all of it can be decrypted. With Windows, you will have…I notice a lot of unauthorized duplications from my machines, and it’s closed source, you don’t know what is going on in the background, you don’t know the source code. And you might say, “Well, I know the source code of Linux but I’m not a developer, I have no idea what it means” It doesn’t matter, a lot of other people know what it means, a lot of other people who made it. Somebody who says something out there on the forums, if there was funny going on there. I don’t what’s going on with Windows, under the hood, and I don’t know what’s going on with OSX under the hood, and therefore I generally don’t like using them for anything unless I am practically forced to do so. My primary operating system that I use in my daily basis for productivity work, with pen testing and development is Linux, and it has the largest, practically the best tools for development and for pen testing. It doesn’t matter which distribution you are using, you should be able to install pretty much all the tools on all the distributions out there. Anyway, you will need a machine where you will have Linux installed. So, we will need Linux as an operating system installed. I will tell you which distro to choose, I will make suggestions and I will show you how to install it. Now, to answer the questions in advance, yes, you can have a virtual machine on Windows or OSX. Yes, you can have a bootable USB with persistence storage, and yes, you can have dual boot on Windows and OSX, all these three setups are…first of all, you’re gonna encounter a lot of problems with dual boot, with both Windows and especially OSX. Linux dual booting with OSX and Windows is a huge problem, especially with the UEFI Bios. Some of you might argue and say, “Well, it’s not, I’ve succeeded in doing it” Yes, I’ve succeeded in doing it, it works, but, it’s a hassle to get it to work, or at least it was a hassle for me, the process is buggy, you will encounter a lot of problems and a lot of your problems I cannot replicate them and not know how to solve. I can’t replicate them and therefore I don’t know how to solve them, because the dual boot behaves differently on different machines with different BIOSes. On different motherboards that is. So, have a machine which has Linux installed as a single operating system. All these other optional setups, like dual boot, live USB, virtual machines, I’ll go ahead and create these videos for you and I’ll post them on Youtube as optional setups, but that’s not the setup that I will be using, that’s just something that I will post there for you, so you can have a look, but it will not be a part of this course at all. They will be on Youtube, they will be completely free, no need to registering or anything like that. If you want have that kind of setup you can go, have a look at it, but I make no guarantees there. Ok, so, in terms of hardware, First, what you need to consider is driver compatibility. Driver compatibility has been an issue for a very long time with Linux, but lately it hasn’t been a problem almost at all, because Linux nowadays supports pretty much most of the devices out there without any problems, with open source drivers, and open source drivers, yeah, they tend to work, really, really, really well with most devices out there. There are still hiccups here and there, but, it works. However, you will need to make sure that your system that you are using in terms of hardware components is compatible with the Linux kernel. You do this by basically getting the list of components of the PC and just typing in on the net, like, wireless card, what number, drivers for Linux, and it’s gonna tell you, yes, they do exist or no, they do not exist. If you type in, like, graphic card, this graphic card driver’s for Linux. Yes, they do exist or they do not exist, so that’s some of the checkups that you need to make. In general, if the drivers exist for, I mean if you have drivers in one distribution and if they’re open source you can have them for pretty much all the distributions without any problems. Next up is really important, so router access, you will need access to your home router, you will need to be able to access it. A lot of ISPs these days, they tend to block the user access to the home router. I don’t know why they do this, most likely because they don’t want a ton load of people messing around with the configuration of the routers. And they don’t know what they’re doing, so they mess things up and they call support and it takes valuable time and effort and it costs them money. So they just lock the router. But, if you don’t have access to your router, what you can do is just give them a call or write an email, asking that you would like to have a permission, that you would like them to unlock the router and they will tell you: “Okay, but you can do that at your own risk” Most likely if you mess something up, they will charge you some small amount to restore the original configuration. But, you can basically back your router up, once they unlock it. And just create a backup file and you can use that as a restore point in case you don’t know how to restore the internet connection in your house. However, you will need access to your router because we’re gonna be configuring, we’re gonna be opening up this machine to the outside world, so it will be accessible from outside world. This will be necessary for certain setups, I will show you how to configure the router and to configure….what you need to do is pretty much the same on every router, however, the interfaces on the routers will vary, but it’s quite simple, there isn’t much up to it. Wireless cards, this is also you will need to keep in mind, they need to be, not only compatible with Linux, but they need to be compatible with Aircrack and Reaver, so Aircrack-ng and Reaver. Some wireless cards function well, other do not, you can look it up on the net which ones do and which ones do not. In the final account of things, you can just go ahead and use the one that you have and see how it works out. Chances are that it will work, but again, that’s some of the information that you will look up on the net. You see, first of all you establish which chipset does your wireless card use, you can do this by typing in the model of your wireless card on the manufacturer’s website and the manufacturer will have the chipset listed there. Then you check whether that chipset has compatible drivers for Linux, and whether that chipset is supported by Reaver and Aircrack-ng. All this information is listed on the sites. So you just use your favourite search engine and, I assure you, you will find these results without bigger difficulties. If you fail by some crazy chance to do so just go with the flow and see what happens. See if it works out or if it doesn’t. The CPU, now the CPU that you have should support virtualization options, that means for Intel, you will need VT-d and for AMD you will need AMD-Vi. These are the flags which tell you if the processor is capable of virtualization. That’s the simplest explanation I can give in that regard. Make sure that your, it will be nice if your CPU supported virtualization so that you can do everything that I do as well. How do you check this? Well, you go to the manufacturer’s website and again, you see whether it’s supported or not, you can even ask the manufacturer with an email if it supports virtualization or not, just give them a call, I mean, and ask them quite literally, just give them the model number and they will be able to tell it to you, yes or no, without any problems really. Now, RAM, it will be good if this machine where Linux will be installed would have at least 4GB of RAM. Linux doesn’t necessarily requires 4GB, it’s gonna run with less than 2GB without any difficulties. It’s not RAM hungry like Windows and OSX are, but it would be good if you had more than 4. Why more than 4? For smoother operations of virtual machines, because we’re gonna have some of them, which we’re gonna set up there, and that we will use as our own small virtual servers, as our own pocket environments, where we shall conduct our research and where we will…the servers which we will use in order to go through the course, we’ll build our own environments where we will perform whatever it is that we need to do. USB, have a USB lying around, some USB, it may not be a big USB, it may not be a 3.0 USB or anything like that, pretty much any USB stick will do. What will you need it for? One of the basic things that we might need it for…I can show you how to make a cryptographic key, how you can convert it a USB into a crypto key, when you plug your USB into a laptop, you basically unbox or unencrypt your drives and it unlocks your PC. And then you can have another layer of security on top of that and it can request for a password confirmation as well. So that’s really good security for you right there. In addition to all of this, I will also show you how to monitor traffic, how to protect yourselves, how to secure your environment, how to figure out what’s going on on the network. where to post listening, where to listen for the network traffic, how to figure out what is going on and such things. And in addition to all of this, my final thing that I would like to state here, is the disclaimer. I am not in any way responsible for what you do with the knowledge that I give you, I’m giving you this knowledge in good faith, this knowledge is presented here in good faith, that you will use it properly and that you will not abuse it in any way. As all of this is for educational purposes so that you will gain knowledge, not so that you go messing around with your neighbor’s Wi-Fi. I mean, just don’t that, it’s quite stupid, you have nothing to gain and you can get into a lot of trouble for no reason of whatsoever. So, that’s it, I’m gonna go head bid you all farewell and wish you a ton lot of luck with this course and I hope that you have a lot of fun as we go through a lot of these things.
If you want to get started as an ethical hacker, learn how network security professionals protect their systems, or take your IT career to the next level you are going to LOVE this course! This course is a sequel to The Complete Ethical Hacking Course: Beginner to Advanced! which over 50,000 students have taken, and was at one point the most popular ethical hacking course in the world! Join us now and receive over 80 lectures & 15 hours of HD video, and 1 on 1 assistance from experienced network security professionals! Enroll now for only $25!
We will cover the following topics in this course:
Introduction to ethical hacking
Linux installation, terminal basics, and Wireshark Setup
Staying anonymous online, proxy servers, and accessing the dark side of the internet using TOR
Aircrack-ng, HashCat, and wifi hacking
Defending your own networks from attacks
Cloning websites
Arduino USB keylogger that works out of the box for Windows 7, 8, 8.1, and 10
Windows power shell scripting
This course will receive monthly updates based on students requests, and our goal is to make this the #1 network security course online!
DISCLAIMER The attacks demonstrated in this course can cause serious damage and are only shown for educational purposes. The intent of this course is to give you the tools to defend your own networks, share skills that are valuable to companies all over the world, and help you to better understand the challenges that information security professionals face on a daily basis.
English & Spanish subtitles available.
Thank you for taking the time to read this, and we hope to see you in the course!
Let’s begin building our free, SEO targeted Twitter following. The first step is to find a Twitter profile to pull followers from. When building up Twitter profiles on behalf of clients I would do a Google search similar to this:
This was an ideal profile to begin pulling followers from because at the time she had over 300,000 and was doing a similar following strategy as the one I will show you. Finding someone in the same geographical are isn’t necessary, but you want to make sure you find a page that posts similar content.
Next, you will want make an account with Tweepi http://tweepi.com/auth/signupTweepi is a Twitter management tool that will allow you to rapidly follow/unfollow people.
The free version of Tweepi let’s you follow 250 and unfollow 100 users per day. These limits reset at midnight PST.
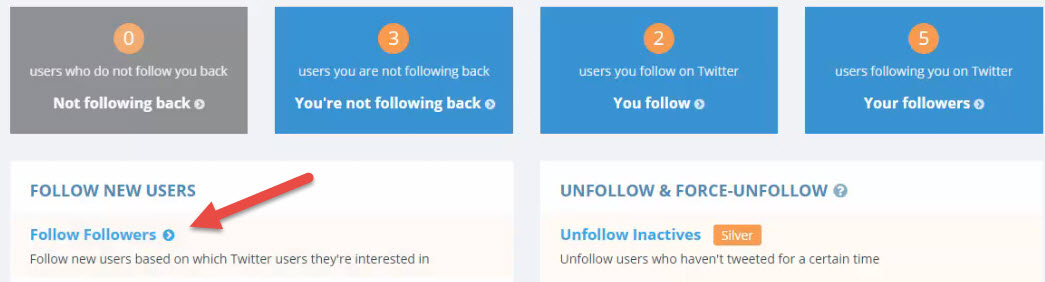
Once you create your account and link your Twitter profile, you can begin following new people. Click the “Follow Followers” link.
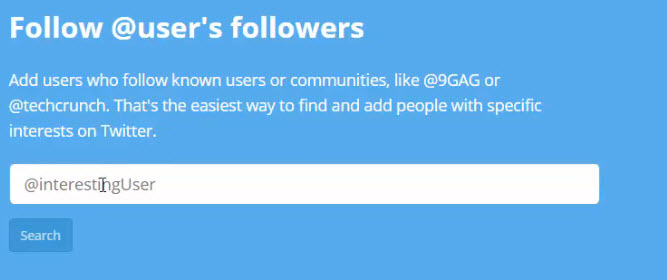
The next screen will prompt you to type in the username of the person you want to pull followers from.
If you haven’t found a page you want to follow the followers of, feel free to use my Twitter profile @UdemyJoe https://twitter.com/udemyjoe nearly everyone should follow you back. Before you begin following users, scroll down to the bottom of the page and increase the number of users to 40 per page. You will then be prompted to give Tweepi a quick shout out.
We are almost ready to begin following profiles. First, let’s set up a few filters to find the people who are the most likely to follow us back.
You do not have to include all of these, just be sure and use the follow ratio filters. A follow ratio of 100% means that the user follows all of his followers. I use the last tweeted and profile image filters to make sure I am following active Twitter users. The friend or follower is neither removes profiles I have already followed from the list. If no users show up on the list it means the system has filtered them all out. Just keep skipping pages until you find new users to follow.
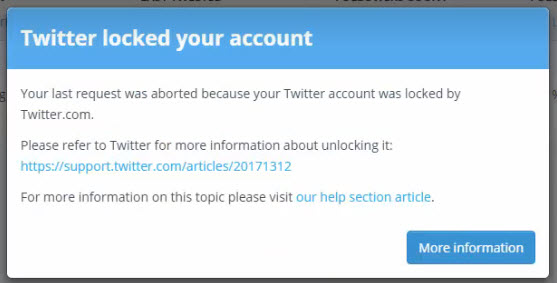
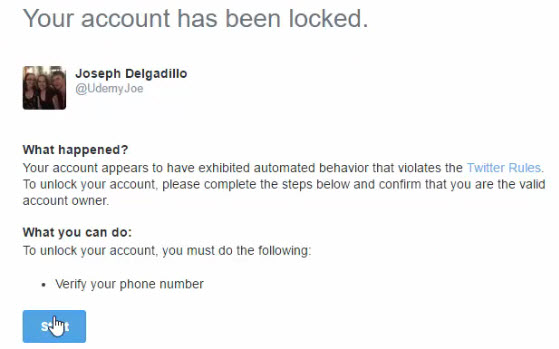
If you are using a brand new Twitter account there is a good chance you will need to unlock your account.
This is why I recommended adding you mobile phone during during the sign-up process. Just wait for the confirmation number and follow the instructions that Twitter gives you.
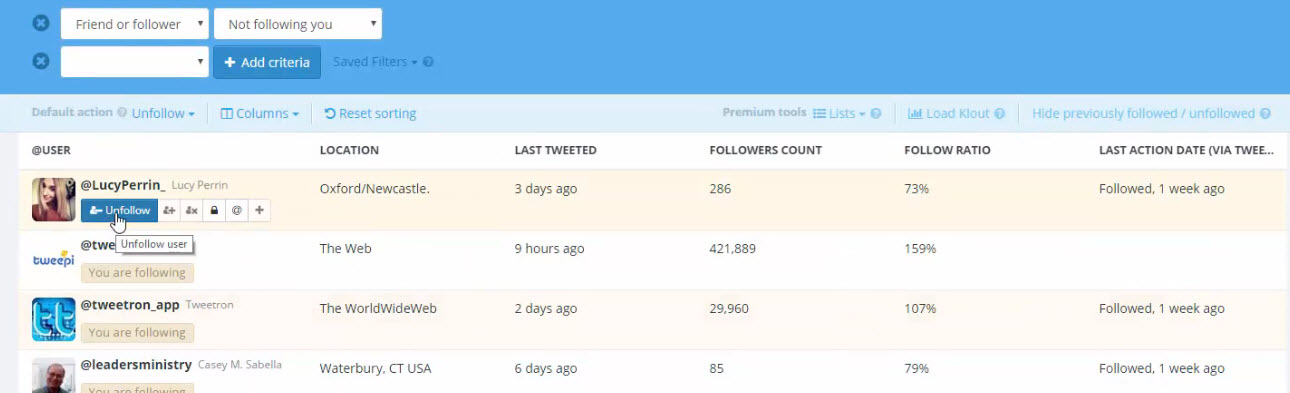
Next, we will unfollow users who do not follow us back. Remember, you need to wait at least 3 days before unfollowing anyone you follow through Tweepi. Start by clicking the “You follow” button.
Next, set-up the filter “Friend or follower” → “Not following you”
Results are displayed in chronological order so start with the last page.
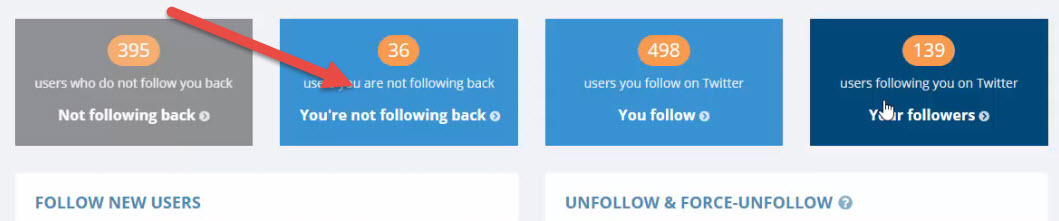
I like to begin each new day by following people who follow us first via the “You’re not following back button.
Rinse & repeat each day 🙂
Tweepi Platinum
The free version of Tweepi is a great tool for getting started, but the premium version enables you to do so much more with building your following. With premium you can follow 950 and unfollow 500 users per day and you can unfollow users down to the specific day since you first follow them. With platinum you can save filters, follow based on a geo-targeted Tweet search, and look for users based on their interests. Platinum also enables you display 200 users per page which allows you to follow faster. Click the “Upgrade to Premium” button for the package that best suits your needs.
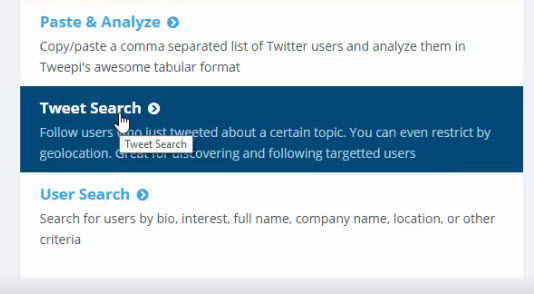
The “Tweet Search” feature allows you to follow people based on their geographical location.
If you are building a profile for a local or regional business this is an awesome feature because it enables you to find people in a specific area. Let’s pretend I own a coffee stand in Seattle and want to find people who tweet about coffee.
After we set up a few filters we can begin following.
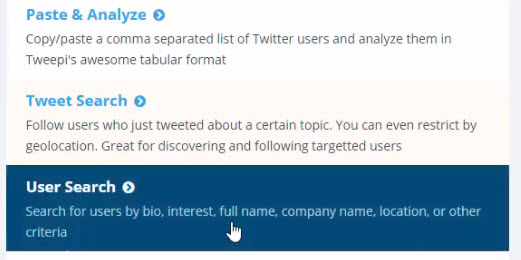
You can also search for users by bio, interest, full name, company name, or location.
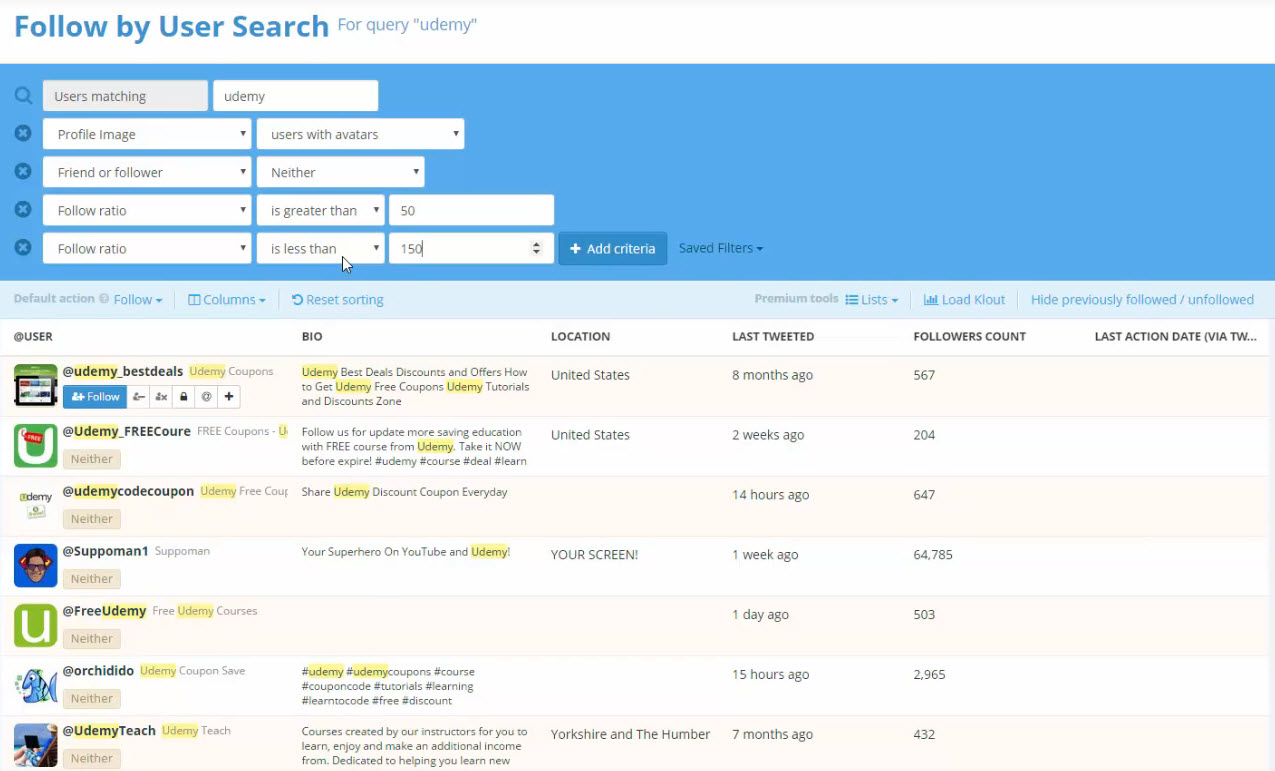
Let’s say I wanted to network with other people affiliated with Udemy. I would use “Udemy” as the query and set up the normal filters.
The premium version of Tweepi is great if you need to take targeting to the next level. I mainly use Tweepi premium for the increased following limits. I hope this system makes sense and helps you to grow your following on Twitter. Happy following!